
| 일 | 월 | 화 | 수 | 목 | 금 | 토 |
|---|---|---|---|---|---|---|
| 1 | 2 | 3 | 4 | 5 | ||
| 6 | 7 | 8 | 9 | 10 | 11 | 12 |
| 13 | 14 | 15 | 16 | 17 | 18 | 19 |
| 20 | 21 | 22 | 23 | 24 | 25 | 26 |
| 27 | 28 | 29 | 30 | 31 |
Tags
- Z-점수 기반 이상치 탐지
- 군집화 시각화 방법
- 주성분 줄이기
- 데이터 종류에 따른 분석 방법
- 데이터 분석 프로세스
- 데이터의 차원 축소
- ARIMA 모델링
- R과 Python
- 다중상관분석
- 범주형 데이터
- 선형 판별 분석 LDA
- Python
- 시계열 모델링
- 상자 그림
- 시계열 상관 분석
- 순서형 데이터
- 상위포지션
- Q-Q 플롯
- custom vision
- 상관 분석
- 시계열 특성을 고려한 이상치 탐지
- 지수평활법
- 최소-최대 정규화
- ARMA 모델링
- 데이터 수집 및 전처리
- 다변량 분석
- 주성분 분석
- 계절성 모델
- 명목형 데이터
- 날짜 시간 데이터 전처리
Archives
- Today
- Total
me made it !
MMDetection 환경세팅 본문
반응형
MM Detection 환경세팅
1. 가상 환경 구축
conda create -n mmdetection python=3.112. pytorch 설치
conda install pytorch torchvision torchaudio pytorch-cuda=11.7 -c pytorch -c nvidia3. MMCV-FULL 설치
우선,
https://mmcv.readthedocs.io/en/latest/get_started/installation.html
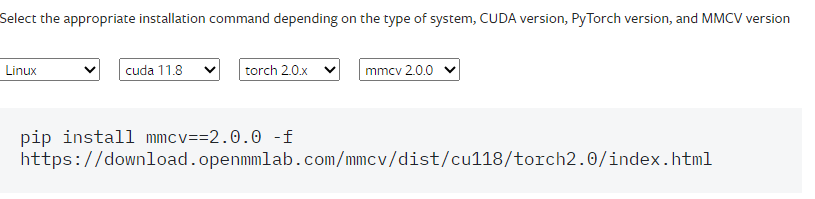
에서 자신의 환경에 맞게 선택 . 복붙 해오기
Installation — mmcv 2.0.1 documentation
Docs > Installation 以中文阅读 Shortcuts
mmcv.readthedocs.io
에서 자신의 cuda 버전 확인하고 맞는 버전으로 설치
(확인하는 방법 - 사이트 연결 후 )
pip install mmcv==2.0.0 -f https://download.openmmlab.com/mmcv/dist/cu117/torch2.0/index.html
4. github 에서 detecion.zip 다운로드 후 만든 가상환경으로 인터프린터 생성
https://github.com/open-mmlab/mmdetection/archive/refs/heads/main.zip
4 -1 ) 경로 잡기
cd C:\Users\labadmin\Desktop\0803\mmdetection-main5. install MMDetection (수동 설치)
pip install -r requirement/build.txtpip install -v -e .5 -1 ) 설치 확인
pip install mmdet
6. 테스트 코드 이용하여 환경 세팅 여부 체크
from mmdet.apis import init_detector, inference_detector

config_file ='./configs/faster_rcnn/faster-rcnn_r50_fpn_1x_coco.py'
checkpoint_file = './checkpoint/faster_rcnn_r50_fpn_1x_coco_20200130-047c8118 (1).pth'

device = 'cuda:0'

model = init_detector(config_file, checkpoint_file, device=device)

test = inference_detector(model, './demo/demo.jpg')

print(test)
Model_zoo : https://github.com/open-mmlab/mmdetection/blob/main/docs/en/model_zoo.md
반응형
'TIL' 카테고리의 다른 글
| [GIT] VScode 에 Git Graph 설치하기 (0) | 2024.06.26 |
|---|---|
| [Jquery] jquery min js와 slim js의 차이점 (3) | 2024.05.05 |
| (YOLO) The difference between the two types of object detector (0) | 2023.07.21 |
| 가상환경 구축 후 파이토치 설치 방법 (0) | 2023.06.16 |
| 가상환경에 pytorch 설치하는 방법 (0) | 2023.06.12 |
'TIL' Related Articles
more

